Zenodys Native Computing Engine
Zenodys is Visual Development Tool, sandboxed execution environment and decentralized marketplace of digital assets. These aspects might seems unrelated at first sight, but properly combined together they create a marketplace where everyone, regardless of programming skills, are able to trade their digital assets.
For example, non developers can easily create applications with just drag’n’dropping visual icons and setting their properties inside Visual Development Tool. Applications can gather data from their devices and other sources and are executed off-chain inside sandboxed execution environment. Gathered digital assets are then published on distributed Digital Assets Marketplace.
Applications on consumer side are similar to ones on supply side. But instead of publishing digital assets to marketplace, they deliver purchased digital assets from marketplace.
Applications on consumer side are similar to ones on supply side. But instead of publishing digital assets to marketplace, they deliver purchased digital assets from marketplace.
Visual Development Tool is browser based IDE for visually connecting microservices (Elements). Created visual scripts are then executed by orchestration tool (Computing Engine) on edge devices in sandboxed execution environment.
Developer’s contributions are creating algorithms, applications and UI’s that are later used by non developers in form of Visual Elements.
Motivation
We all have bunch of digital and analog assets. But the main problem is that most of us don’t have the required knowledge to gather and put them into some standard tradeable form.
On the other side — the demand side — companies need large amounts of data (from data for predictive maintenance purposes to heartbeat data in medical industry) that just can’t acquire.
Those problems motivate us to create a digital assets marketplace where everyone are able to trade their assets.
Vision
Our vision is to build a decentralized digital assets marketplace with help of blockchain technology that would allow a transparent and fair rewards system. No matter if we are programmers or not. The marketplace will be driven by our advanced Visual IoT/Industry 4.0 platform which will be open sourced
Current State
We started to transfer platform from private to public repositories.
The platform contains two main parts, Visual Development Tool that is browser based IDE for creating projects and Computing Engine, microservice orchestration tool that executes visual scripts made in IDE on edge devices.
This repo contains the Computing Engine and Elements (microservices). The Computing Engine is completely transferred and Elements will be added gradually.
Next step is to open source the Visual Development Tool.
Getting Help
For technical help, or general discussion, please use the Telegram Channel.
Contributions
Digital Assets is wide term. It can be anything in digital or analog form — from real time streams, historical data, files.. to more advanced assets like algorithms, microservices, dApps, UI’s…
Contributors can be divided into the following categories:
- Non technical and Business Developers. These contribute by creating workflows in the Visual Development Tool. They trade created workflows or can use them to gather other digital assets, like data, and trade those gathered assets.
- Technical users with basic programming knowledge that are creating advanced workflows. Platform contains Elements where snippets of code in different languages can be entered into their properties. This offers a higher degree of flexibility and can cover most complex scenarios. It is a perfect sweet spot between simplicity and flexibility.
- Element creators, programmers that use programming tools to create standardised microservices for Computing Engine. If you are reading this on github, then that’s you :)
All contributors will be fairly rewarded along the entire value chain. For example, the creator of an advanced predictive maintenance algorithm is automatically awarded each time his Element is used in a project. All users are rewarded by their shares of contributions if more than one works on the same digital asset.
You can get more in-depth here:
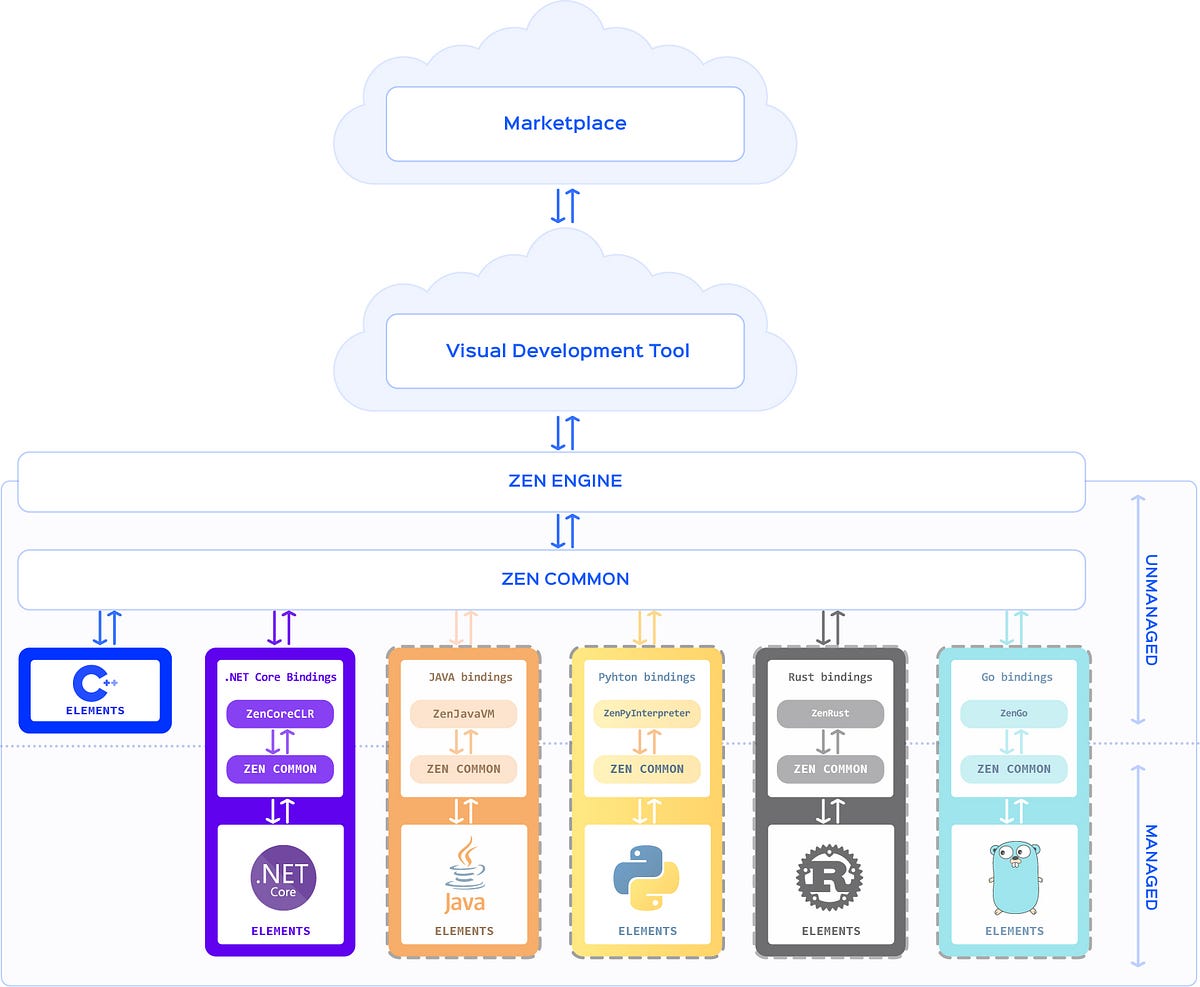
Architecture
Digital Assets Marketplace
Decentralized marketplace to trade digital assets.
Visual Development Tool
Browser based IDE for developing and debugging Visual Scripts. Scripts are manually or remotely transferred to ZenEngine (Computing Engine).
ZenEngine
Computing Engine runs on edge devices and executes Visual Scripts. Edge device can be any Linux or Windows machine. This can be small embedded device like Raspberry or virtual machine hosted on Azure. It just depends on project requirements.
ZenCommon
ZenCommon is glue between Elements and Computing Engine. Elements are isolated units that are not directly referenced and do not depends on ZenEngine. ZenCommon is abstract layer between Elements and ZenEngine.
Bindings
Bindings to different programming languages in which Elements for native Computing Engine can be written. Currently .NET Core CLRbinding exists, but others will be added gradually.
C/C++ Elements
Native Elements are microservices handled and executed by Computing Engine. Element can be simple (counter, digital input…), or complex (AI algorithm, ZWave protocol…)
.NET Core Elements
Managed Elements are similar to Native but developed on .NET Core platform
Workflow Features
Parallel Loop Executions
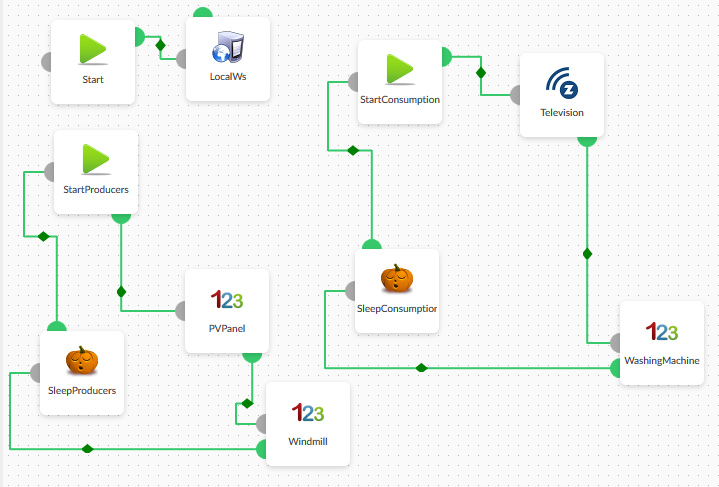
In general, each loop has an entry point (Start Element) where execution begins. You can create as many independent loops as you want that runs parallely inside the same project.
Smart Tags
Smart Tags are “HTML like” tags enclosing Element id’s and allowing sharing data between Elements. Smart tags are replaced with actual Element values at the runtime.
For example, consider following performance test where we want to measure and display response time of ZWAVE device:
For example, consider following performance test where we want to measure and display response time of ZWAVE device:
If “WriteLog” contains following text in “Text” property:
output would be similar to this:
Execution time:420 ms
Measured power:100 W
Supported smart tags are:
- result
for sharing results between Elements - error_code
for sharing error codes between Elements - error_message
for sharing error messages between Elements - status
for sharing current statuses between Elements (Stopped, Running, Paused…) - started
indicates if Element has been already executed - ms_elapsed
measured Element execution time in ms - last_executed_date
information when Element was last executed
Event Buffering
Sometimes machines or software sources have peaks where large amount of events are generated. If event processing takes some time and event frequency is high then events can eventually get lost. That’s why Zenodys platform supports Event Buffering where events are stored inside Elements and processed sequentially.
Consider following example:
“MQTTSubs” is MQTT subscriber that periodically receives large amount of events. Then some regression algorithms are applied to those events which are then stored to SQL SERVER database. Last step is to save event information into the blockchain.
Let’s say that regression algorithm and database storing require synchronous processing. In such case we can set “MQTTSubs” Element property to pull new event from buffer after “Store” Element ends.
Let’s say that regression algorithm and database storing require synchronous processing. In such case we can set “MQTTSubs” Element property to pull new event from buffer after “Store” Element ends.
Script Elements
Script Elements allows additional fine tunings.
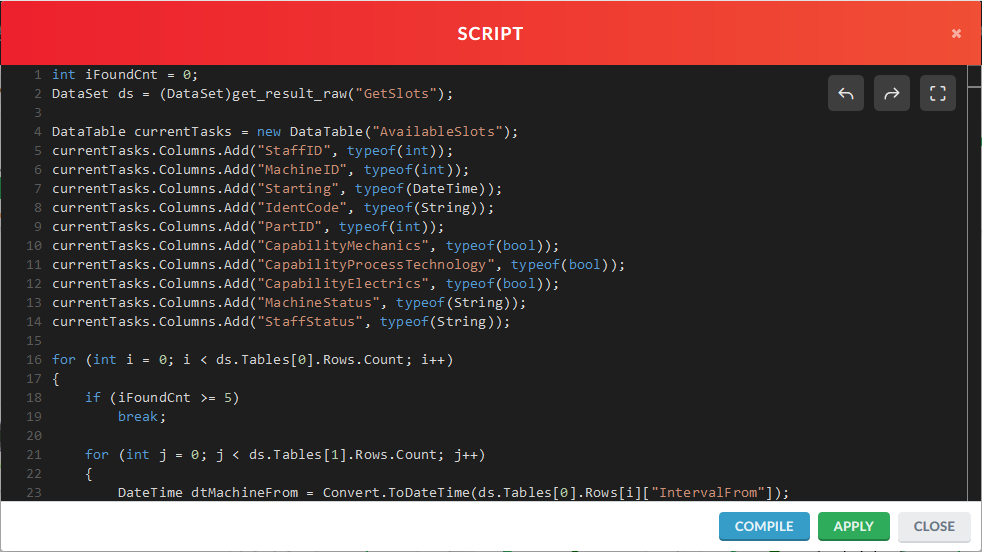
In cases when additional scripting is needed, whether for personalized business logic or for performance improvements, scripts in various programming languages (currently C#, Javascript, Python) can be entered right into the Script Element.
In cases when additional scripting is needed, whether for personalized business logic or for performance improvements, scripts in various programming languages (currently C#, Javascript, Python) can be entered right into the Script Element.
Built in functions enable retrieving results from other Elements, executing other Element, setting Element properties and much more with just one line of code.
Adjusting Workflow Execution at Runtime
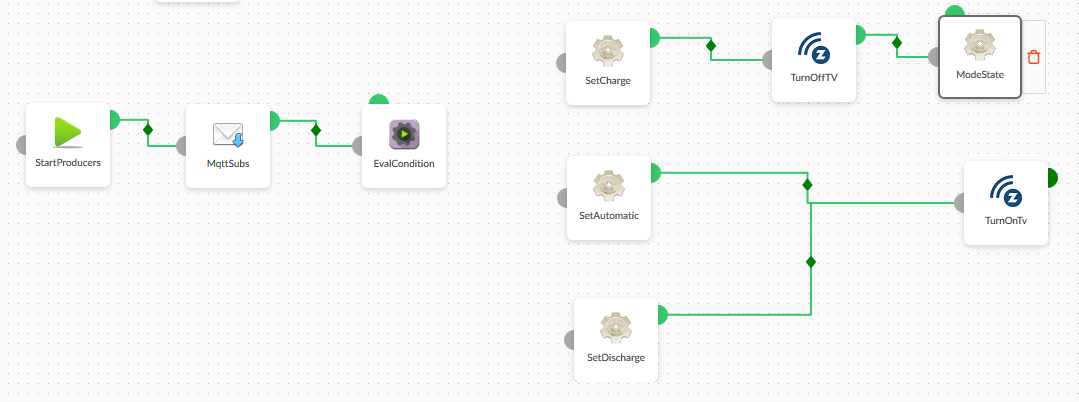
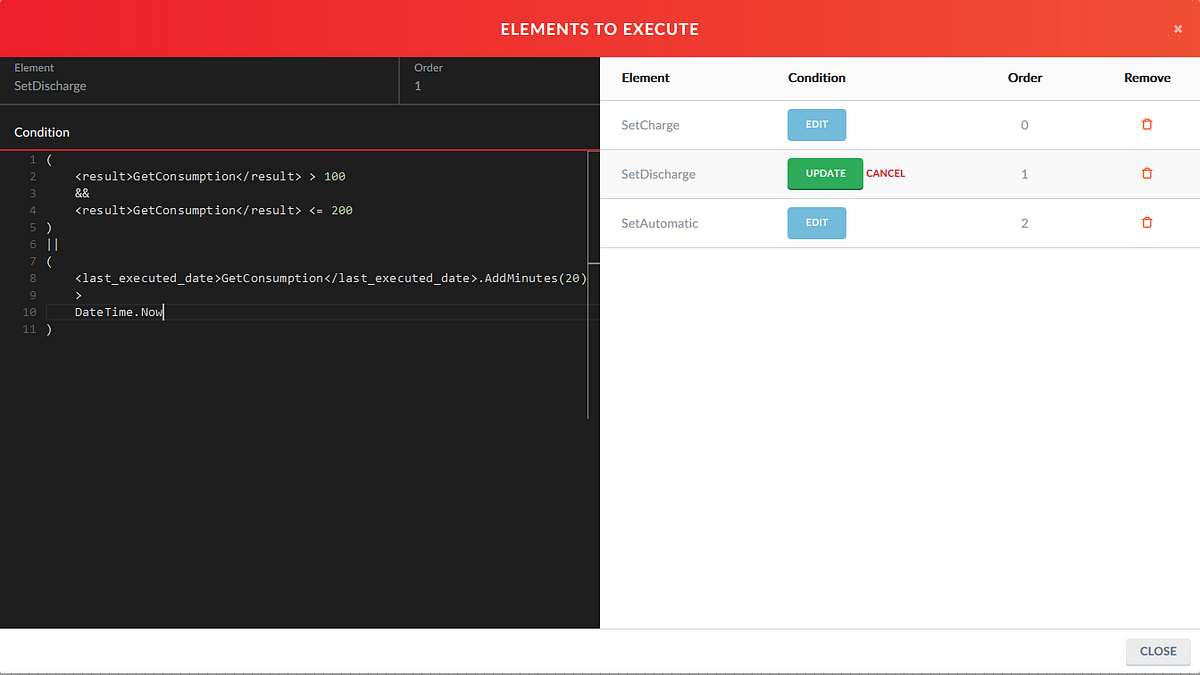
Real life projects are complex with many workflow paths. In many cases paths, on which workflow shall proceed are evaluated and decided in runtime. Such complexity leads to interlaced and hard to maintain connections between Elements. Zenodys solves with easy to use Element that executes Elements based on current conditions.
Following example subscribes on MQTT events. After the event receives value, it gets evaluated and workflow proceeds on “SetCharge”, “SetAutomatic” or “SetDischarge” Elements.
Elements are executed based on runtime evaluation of complex or simple conditions. Those conditions are entered into property of the Element that is able to execute other Elements:
Build Instructions
Overview
To successfully build project you’ll need to install several tools. One of them is Visual Studio Code which is very light and powerful cross platform IDE for building and debugging Elements on Linux, macOS and Windows platforms. Same tool will be used for debugging both, native and managed Elements.
Along with tools, you’ll also need Visual Script made in Visual Development Tool. Script is premade to get you started quickly. After completing environment setup for building and debugging Elements, you will probably want to experiment with your own Visual Scripts inside Visual Development Tool. IDE is not open sourced yet and is currently available athttps://app.zenodys.com
You can request login to insider preview on our Telegram Channel
You can request login to insider preview on our Telegram Channel
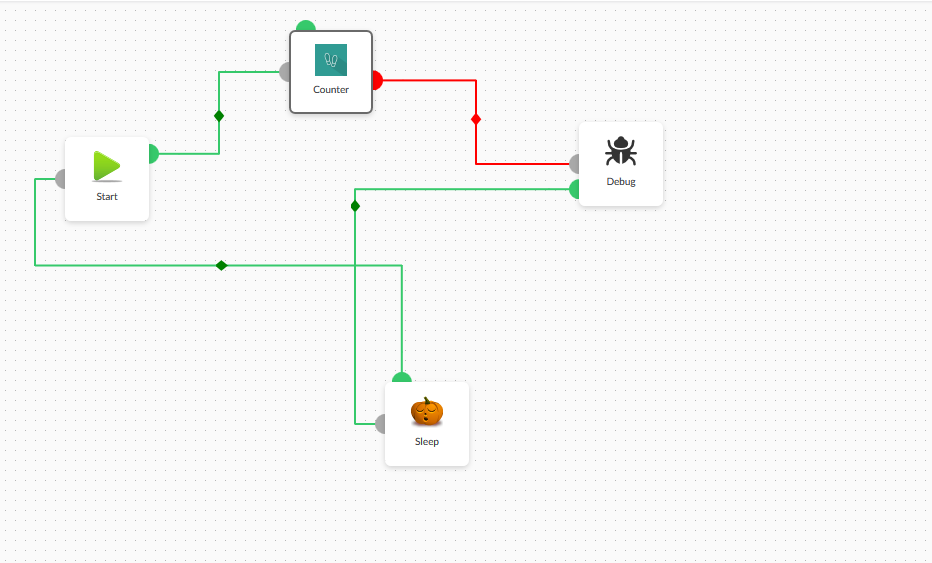
For the sake of simplicity, pre-made Visual Script is simple loop that writes current counter value to console window.
Knowing what script does is not crucial for setting up environment and start debugging Elements, but here is quick info for those curious:
- Loop entry point is “Start” Element
- Then it moves to “Counter” Element that has two outputs, red and green. If condition is satisfied (counter reach some value), then workflow proceed to green connection, otherwise to red. It’s safe to connect just red connection in this example, because value is set high.
- Next Element in workflow is “Debug” and prints current “Counter” value
- “Sleep” Element stops loop for 1 second and after that steps are repeated
“Start”, “Counter” and “Sleep” Elements in this loop are native, and “Debug” is managed.
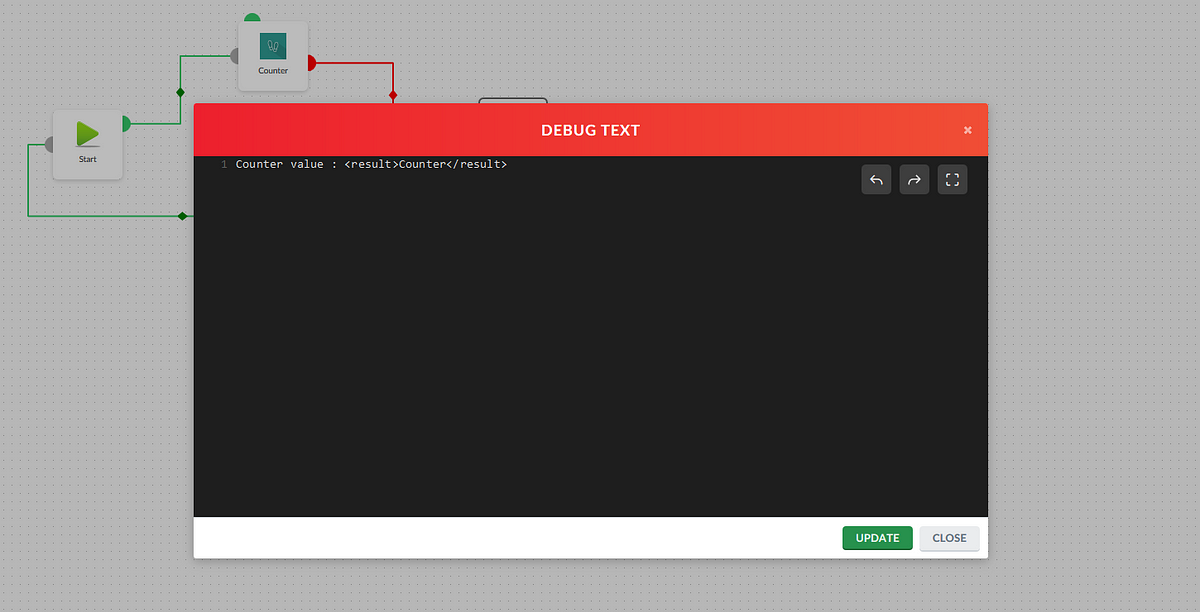
Special tags exists inside Zenodys platform. One of them is “result” tag that allow sharing results between Elements. Here is example of “Debug” Element text property:
Required skills
Computing Engine is written in native C and supports Elements written in C/C++ and .NET Core (both can be mixed inside same project in Visual Development Tool by end user).
.NET Core Element developers doesn’t have to have C/C++, and C/C++ developers doesn’t have to have .NET Core knowledge to create Elements.
.NET Core Element developers doesn’t have to have C/C++, and C/C++ developers doesn’t have to have .NET Core knowledge to create Elements.
Developing .NET Core Elements is simple, but some basic understanding of C# and Object Oriented Programming Concepts is needed. Although raw pointers are passed from Computing Engine, they are needed just in managed binding layer which acts like wrapper between managed and unmanaged code. This layer offers abstraction from managed to native Elements so that they are able to share state between each others.
Here is example of simple Element that writes string on Console:
// Needed in all Elements. Inits unmanaged Elements so that can be accessed from managed code.
// It can be copy/pasted to each new Element. Just note to change ZenDebug type to new one
unsafe public static void InitUnmanagedElements(
    string currentElementId,
    void** elements,
    int elementsCount,
    int isManaged,
    string projectRoot,
    string projectId,
    ZenNativeHelpers.GetElementProperty getElementPropertyCallback,
    ZenNativeHelpers.GetElementResultInfo getElementResultInfoCallback,
    ZenNativeHelpers.GetElementResult getElementResultCallback,
    ZenNativeHelpers.ExecuteElement executeElementCallback,
    ZenNativeHelpers.SetElementProperty setElementProperty,
    ZenNativeHelpers.AddEventToBuffer addEventToBuffer)
{
    if (!_implementations.ContainsKey(currentElementId))
        _implementations.Add(currentElementId, new ZenDebug());
    ZenNativeHelpers.InitUnmanagedElements(
        currentElementId,
        elements,
        elementsCount,
        isManaged,
        projectRoot,
        projectId,
        getElementPropertyCallback,
        getElementResultInfoCallback,
        getElementResultCallback,
        executeElementCallback,
        setElementProperty,
        addEventToBuffer);
}
// It can be copy/pasted to each new Actionable type Element.
// But instead of PrintText, call your function
unsafe public static void ExecuteAction(
    string currentElementId,
    void** elements,
    int elementsCount,
    IntPtr result)
{
    // Call PrintText function
    _implementations[currentElementId].PrintText(
        ZenNativeHelpers.Elements,
        ZenNativeHelpers.Elements[currentElementId] as IElement,
        ZenNativeHelpers.ParentBoard);

    // Return some status to Computing Engine
    ZenNativeHelpers.CopyManagedStringToUnmanagedMemory(string.Empty, result);
}
// Element specific function. Put simple (like reading from file system)
// or complex (predictive maintenance algorithms) logic here.
// At this point you are part of Zenodys ecosystem
// You can share result with other Elements, adopt workflow execution to current conditions,
// change properties of other Elements and much more
void PrintText(Hashtable elements, IElement element, IGadgeteerBoard ParentBoard)
{
    // GetElementProperty returns property value that user set on Visual Development Tool
    string text = element.GetElementProperty("TEXT");
    Console.WriteLine(text);
    element.IsConditionMet = true;
}
And here is example of simple Counter Element written in C:
// Called for Elements that needs to init some values
EXTERN_DLL_EXPORT int onNodePreInit(Node* node)
{
    node->lastResult = malloc(sizeof(int*));
    *node->lastResult = malloc(sizeof(int));
    *((int*)*node->lastResult) = atoi(common_get_node_arg(node, "INITIAL_VALUE"));
    node->lastResultType = RESULT_TYPE_INT;
    return 0;
}
// Called for Actionable Elements.
EXTERN_DLL_EXPORT int executeAction(Node *node)
{
    int currentCounterValue = *(int*)*node->lastResult + atoi(common_get_node_arg(node, "COUNTER_STEP"));
    node->isConditionMet = currentCounterValue >= atoi(common_get_node_arg(node, "MAX_VALUE"));
    if (currentCounterValue >= atoi(common_get_node_arg(node, "MAX_VALUE")))
        currentCounterValue = atoi(common_get_node_arg(node, "INITIAL_VALUE"));
    *((int*)*node->lastResult) = currentCounterValue;

    return 0;
}
Note that there are more callbacks from Computing Engine (in both implementations, C and .NET Core) that are adding additional flexibility to overall system and will be explained in depth in technical documentation.
Building and Debugging managed Elements on Windows
Prerequisites:
- git
- Visual Studio Code
- .NET Core SDK
- OpenSSL
- Build Tools For Visual Studio
- Install git
- Install Visual Studio Code After installation, Visual Studio Code will automatically detect git path. In case that path is not detected and git is installed, set path VS Code manually. Install following extensions
- C/C++ for Visual Studio Code
- C# for Visual Studio Code
3. If you don’t have Visual Studio, install Build Tools for Visual Studio 2017
- After running installer, select “Visual C++ build tools”
- Be sure to select “VC++ 2015.3 v14.00 toolset for desktop” (actual version can slightly vary)
4. Install OpenSSL. “Win64 OpenSSL v1.0.2o Light” should suffice
5. Install .NET Core SDK
6. Create new folder for project. Make sure that path does not contain white spaces (eg C:\Zenodys)
7. Go into newly created folder and clone ZenDotNet repo. This repo contains .NET Core Elements.
git clone — recurse-submoduleshttps://github.com/Zenodys/ZenDotNet.git
git clone — recurse-submoduleshttps://github.com/Zenodys/ZenDotNet.git
8. Clone ZenUnmanaged repo. This repo contains native Computing Engine and Elements
git clone — recurse-submoduleshttps://github.com/Zenodys/ZenUnmanaged.git
git clone — recurse-submoduleshttps://github.com/Zenodys/ZenUnmanaged.git
9. Go to ZenEngine root dir and rename “project_test” directory to “project”. This is directory that contains pre-made Visual Script. You will probably need to change path of your .NET Core SDK installation directory. To do this, find Settings.ini file and change the “path” value of “NetCore” setting.
10. Create two environment variables:
- ZENO_ROOT pointing to unmanaged ZenEngine root folder (eg C:\Zenodys\ZenUnmanaged)
- ZENO_PROJ pointing to project folder (eg C:\Zenodys\ZenUnmanaged\ZenEngine\project\9024bb0d-137e-4a99–2167–7b5875404b01)
- Restart computer.
11. Now you must build projects.
Open “ZenHelloWorld.code-workspace” in VS Code and press Ctrl+Shift+B to open Build task. Build projects in following order:
Open “ZenHelloWorld.code-workspace” in VS Code and press Ctrl+Shift+B to open Build task. Build projects in following order:
- Native — ZenCommon
- Managed — ZenCommon
- Native Lib — ZenCoreCLR
- Native Element — ZenCounter
- Native Element — ZenSleep
- Native Element — ZenStart
- Native Element -ZenDebugWrapper
- Managed Element — ZenDebug
- Native — ZenEngine
12. Start Debugging Managed Elements
If everything went well, you should be able to start debugging managed and native Elements.
To start debugging managed Elements press Ctrl+Shift+D to open Debug console.
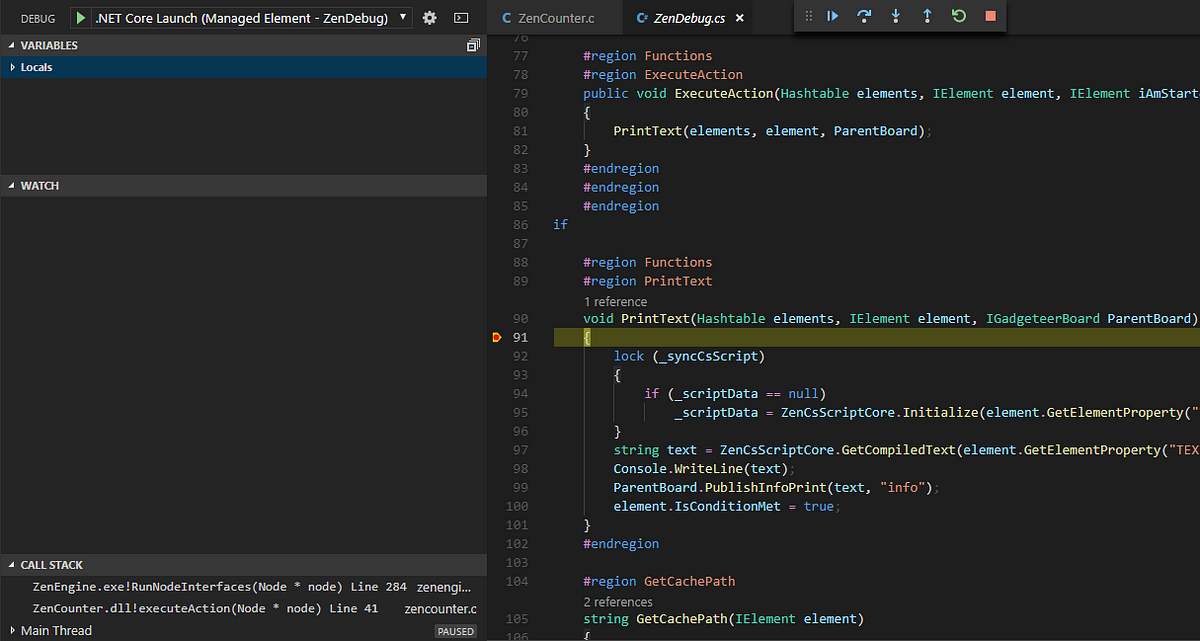
Select launch of “Managed Element — ZenDebug”, place breakpoint somewhere in code and start debugging. Breakpoint will hit and you should see something like this:
13. Start Debugging Native Elements
Press Ctrl+Shift+D again to open Debug console.
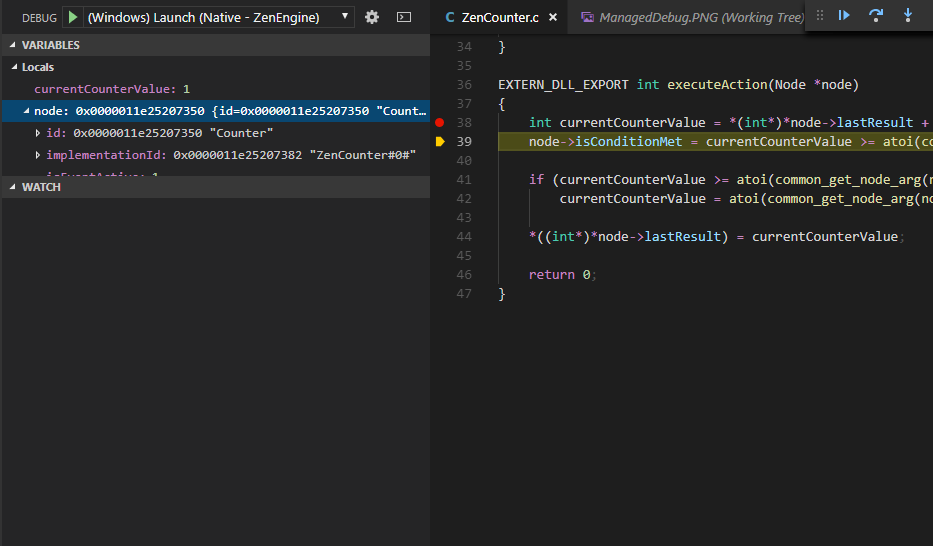
Select launch of “Native — ZenEngine”. Open “Native Element — ZenCounter” project, place breakpoint somewhere inside “ZenCounter.c” file and start debugging. Breakpoint will hit and you should see something like this:
Press Ctrl+Shift+D again to open Debug console.
Select launch of “Native — ZenEngine”. Open “Native Element — ZenCounter” project, place breakpoint somewhere inside “ZenCounter.c” file and start debugging. Breakpoint will hit and you should see something like this:
Building and Debugging managed Elements on Linux
Bitcointalk:
https://bitcointalk.org/index.php?action=profile;u=1582803;sa=forumProfile
ETH:
0x42F510e1456CFf564EC695d1c0056E819933e26c





Komentar
Posting Komentar